I have some weird DIY lights fixtures at home that are controlled over wifi. When I first build them, they used a micropython firmware that speaks MQTT. I added code so they get auto-discovered by home-assistant, but never bothered to fully implement and debug it. One side-effect was that I had to restart the lights as soon as the MQTT connection broke, e.g. when restarting the home-assistant container or network outages. So after I learned about esphome, it was kinda clear that I should just scrap my own python code and write a .yaml file for esphome instead.
For most of the LED-Dimmers that was simple. There is a PCA9685 component in upstream esphome, as well as a BME280 sensor that most of my boards have as well. Sprinkle in a few GPIOs for LEDs and buttons and we were done.
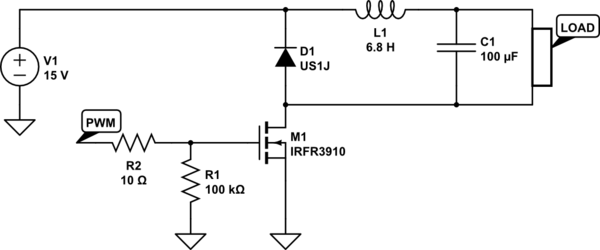
There was only one light fixture I did not migrate until today: my ceiling light. The PCB was bodged and not documented. It has four powerful LEDs that need cooling, so one GPIO controls the fan. Which itself is attached to a low-side-buck-converter.
And to make things even more complicated, the four main LEDs all should be set to the same brightness. So multiple float-output need to be set at the same time. Unfortunately the esphome light component only allows one output. The solution for that is to add lambda code into the .yaml file.
light:
  - platform: monochromatic
    icon: "mdi:ceiling-light"
    name: "Deckenlampe"
    output: 'pwm0_dummy'
    gamma_correct: 1.0 # use 1.0 so we can get the 'real' brightnes by using the get_brightness() call
    id: "mlight"
    # we can get away with not implementing the 'on_turn_off' state, since we always turn on in the on_state call
    on_turn_off:
      - lambda: |-
          id(light09).turn_off().perform();
          id(light11).turn_off().perform();
          id(light13).turn_off().perform();
          id(light15).turn_off().perform();
          float fan_v = 0;
          id(fan_pwm).set_level(fan_v);
          id(fan_speed_sensor).publish_state(fan_v * 100); // show 0..100% value
    on_state:
      - lambda: |-
          // remote_values holds the values reported to the frontend.
          // we cannot use current_values since that is about to update in the on_state change call
          float br = id(mlight).remote_values.get_brightness();
          //ESP_LOGD("main", "===== got brightness %f", br);
          id(light09).turn_on().set_brightness(br).perform();
          id(light11).turn_on().set_brightness(br).perform();
          id(light13).turn_on().set_brightness(br).perform();
          id(light15).turn_on().set_brightness(br).perform();
          // now the fan control
          // these values were checked experimentally, there is no deeper meaning
          // with 80% there is some air movement, but the fans are not to loud
          // and 51% does turn the fans on just slightly
          float fan_v = 0;
          if (br > 0.5) {
            fan_v = 0.51; //130/255
          }
          if (br > 0.9) {
            fan_v = 0.8;  //200/255
          }
          id(fan_pwm).set_level(fan_v);
          id(fan_speed_sensor).publish_state(fan_v * 100); // show 0..100% value
The mlight entity is the only light that is exposed to the user. It has a 1.0 gamma, so its output brightness is the same as the setpoint the user selects in the home-assistant interface. It is mapped to a unused output and only serves as the dummy for controlling the 4 real outputs.
Because esphome adds a transition by default, the trick is to copy the remote_values.get_brightness() value over to the other lights. Then do a lookup for the the fan speed and publish it as template sensor. If you use current_values instead, the lights will always lag behind the actual commanded setpoint, because the on_change handler is executed at the beginning of the transition.